Friday, May 31, 2013

Hair Repair Mask


Hello Girlies,

Today i will be sharing with you all a hair mask that i have been using for a while now. It works wonders for dry and frizzy hair. In summer the heat and humidity adds on to the frizziness and i use it regularly to maintain my locks. This mask helps in locking moisture back into the hair, repairs dry and damaged ends and makes your hair stronger, smoother and shinier.

So lets get started. Ingredients you require for this mask are:

1 Ripe Avocado
1 Egg yolk
1 to 2 tsp of olive oil

Step 1: Scoop out the pulp of avocado in a bowl and mash it into a paste.

Step 2: Take egg yolk and mix it with the avocado paste.


Step 3: Pour in the olive oil to the avocado and egg mixture. Now mix all the ingredients together and make it into a smooth paste.


Step 4: Untangle your hair so there are no knots for smoother applications.

Step 5: Then divide your hair into two layers. I usually divide them into a top and a bottom layer. Tie up the top layer. Then take small section of your hair and start applying the mask focusing on the length of your hair and the ends.

Step 6: When you are done applying the mask all through your hair. Tie all your hair up and cover them up with a shower cap or towel to trap the heat and let the nutrients soak in.

Step 7: Leave the hair mask on for 30 minutes.

Step 8: Then wash it of with lukewarm water and shampoo and condition your hair as you would usually do.

Don’t pull or tug your hair to much and let them air dry. Once dry style accordingly, as usual.Your hair should feel stronger and your ends  restored and moisturized. 

Kisses:)


Thursday, May 30, 2013

High Sleek Bun


Hello girlies,
Summer is here and its getting hot and humid , I wanted to show u guys how to do this really simple high bun. This works out perfect for those days when your hair is really messy or unwashed for 1-2 days. All you need is :
  • Elastic Band
  • Chingnon ( Doughnut )
  • Bobby pins
  • Hair spray
  • Old tooth brush in order to settle  the baby hair.
So here i go

1) First run the comb through your hair and remove all the tangles and  make a high ponytail depending upon how high  you want your bun to be. Fix the ponytail with a tight rubber band  and place the chingnon through the pony as shown in the picture below.

2) Lean forward and spread your hair evenly over the chingnon making sure that it has covered/ hides  the whole chingnon.


3)Hold the bun in place and stretch an elastic hair band to secure the bun. Next we need to roll the extra hair and tuck it in with the bobby pins, one can also use bun pins to fix the extra hair.


4) Next use a hair spray ( I  used wella's hair spray) to fix the whole bun . I have baby hair so i used an old tooth brush to fix it as shown in the picture below. Work out with your hands and hair spray in order to smoothen  the bun till you get that extra sleek look.

 Kisses

Wednesday, May 29, 2013

Polka Dots on Nails


Hello all you beautiful people. Since i bought a bunch of new nail paints few days back, I thought of trying them out today. So while painting my nails I got a little playful and thought of doing polka dots on my nails. Its  much easier than i thought and if I can do it anybody can do it. I have not used any nail art tools.

So what are you thinking?? Lets just get started with this easy to do polka dot nail art.

Things you require for this are nail paints of your choice and toothpicks.

Step 1:  Remove any previous nail paints that you have and see to it that there are no traces left.

Step 2: File your nails in the desired shape. If you have a nail buffer then buff your nails.

Step 3: Then take the nail paints you wish to use. For this I have opted for two variations orange and white/blue and green.Apply the base color as you would normally do. In one I have opted for orange as my base color and in other one green. To enhance it a little more I painted the ring finger with white and blue nail paints respectively as shown in the picture below.


Step 4: Let the base dry completely before moving on to next step.

Step 5: Now comes the tricky part and that is to make dots. Now for this take the nail paint you  chose for the ring finger and since i had opted for white/blue respectively i will use these two colors. Take out a drop of the nail paint on a tissue and then dip the tip of the toothpick in the white/blue nail paint and start making dots on the nails as shown in the picture below. Don't worry you don't have to be perfect.


Step 6: Then repeat the same for the ringer finger. Take a drop of orange/green color and make dots on the ring finger and let them all dry.


Voila its done. See how easy it was and how pretty it looks. Do try this and let us know how it looked.

Kisses.


Tuesday, May 28, 2013

Makeup Haul


Hello girlies, I have been shopping everyday these days since its sunny and you just do not feel like sitting at home. I love hopping in and out from one store to the other and try out new stuff so here is a list of makeup products that i got this month and ohhh i am so excited to try them out.

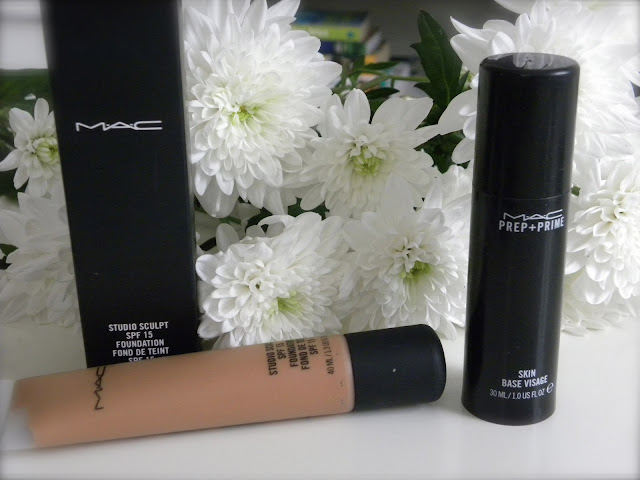
  • I got this new MAC  sculpt  foundation(shade NC 44), its a gel based spf15 foundation  and its very moisturizing, creamy and provides medium to high coverage. It gives a very natural effect and works wonder for dry to combination skin. 
  • Next i got MAC prep+prime and helps the foundation to stay longer and gives that smoothing effect to the skin. Its really good for people with oily skin as its helps in oil absorption.

  • Next i got is MAC Sheertone Shimmer Blush in shade Peechykeen and MAC sheer pressed powder which helps in packing the look.

  • Next i got is these amazing lipsticks and lip gloss from Nordic Caps. I love the colors and they add a tinge of vibrancy to the whole collection.
:


 These are in shades:
  • Nordic cap  LS02 (Red)
  • Nordic cap LS04 (Brown)
  • Nordic cap LS05  (Marron )
  • Nordic cap star gloss in two shades pink and red
  • Next thing i got is Nordic cap nail paints in color black, white, orange and green. In future  i will do some nail tutorials  posts and share it with you all.

  •  Next i bought is Loreal Voluminous carbon black and Maybelline Great lash (very black). I generally apply two to three layers of mascara and i really liked them.

  • Last but  not the least i got this Versace Bright Crystal perfume which was a gift from my husband. I love this EDT and it comes in a beautiful crystal cap bottle and fragrance wise its really fresh, girlie,summery kind of smell.


I hope you guys liked it and in my future posts i will do a detailed review of these products and many more new stuffs. Kisses


Monday, May 27, 2013

Anti Tanning Mask


Summer is finally here and the sun is inviting us  to go out and enjoy the life. I personally love staying outdoors during summer and bask myself in the sun and get my daily dose of vitamin D but along with it i get my share of sun tan. Although i use sunscreen of spf 30 religiously when  ever i am out in the sun but still i get tanned . I recalled my grandma's tip of creating an anti tan mask at home with really easy ingredients available at home.

All you require:

1) one tbsp of yoghurt(curd)
2)1/2 tsp of lemon juice

Mix the two together and apply on your face and other affected areas, leave it on for 10-15 minutes and wash it of with water. We use yoghurt because it has both bleaching and moisturizing properties and lemon is rich is vitamin C and is a very good bleaching agent. You have to apply this mask daily for 4-5 weeks to see results. This is one of my favourite mask because ingredients are readily available at home and its very easy to prepare.